Spent some time recently hand coloring a few prints that have been lingering for a while.
Quite a while, which actually became something of a problem.
First of all, if you haven't read a previous post of mine about hand coloring, 'all the basics', you really should take it in:
http://californiasilverwizard.blogspot.com/2009/06/hand-coloring-b-photo-prints-dying-art.html
One thing i have corrected/added to this post is:
USE A NON-HARDENING FIXER! AND MATTE SURFACE PAPER!
Yes, ALL CAPS is the equivalent of yelling. I am not quite yelling, but saying most strongly, 'use a non-hardening fixer', and matte paper. You'll be glad you did. :-) Also, don't wait too long to hand color a print, these three were printed a few years ago, and I'll bet that letting them be for a long time led to a certain amount of 'hardening' that made the coloring more difficult than usual. The blues, in particular, just did not sink into the paper well, at all.
Which led me to add an extra step to the image refinement process - scanning the hand-colored print, and correcting the blues w/ photoshop.
My methods/work-flow has changed over the years. Obviously, I start w/ a B&W darkroom print. I scan that at 100%, 300 ppi, so i've got it archived.
I print these out at letter size, on cheapo copy paper so i could do a sketch with colored pencils, to get a better idea of what i wanted to do. I guess i could spending hours more doing this in digital?... I'd much rather do ALL of it in about 30+ minutes with some cotton balls and Q-tips.Yes, i'd rather do it the old fashioned ('by hand') way. I usually do some basic colorization of large areas w/ photoshop, I know that's what I'm going to do w/ the handcoloring.
For these prints? I do some initial 'detail' coloring with a small brush and some watercolor inks.
One thing to do to make the watercolor inks go down right/one good hint on watercolors? add some 'photo-flo' or 'wetting agent' to the water you use, and wet down the areas you want to color, BEFORE you add the color - it'll go down much smoother, you'll be glad you did this, the brush strokes will show MUCH less.
If you are working w/ just 1/4 cup water? 1 drop will do.
Then i did an over hand-color w/ oils, first applying some linseed oil, letting it soak into the paper, then wiping off any excess.
It's hard to get the saturation i want in some areas in just one coat, so i let them dry for a couple of weeks - you really need to let them dry *completely* before you go back and add more, otherwise the oil will still be able to 'seep into the previous layer', and take it off, & you'll end up w/ a miserable mess.
Then i did another round of oil colors on them, in less than 2 hours.
The subtle things i can do by hand are much better than anything digital.
Even after thew second round of hand color, i just couldn't get what i wanted out of the blues, in particular, on two prints. So i scanned the prints, and dragged 'em into photoshop, and solved the problem easily.
So here's the process:
1 - Darkroom print
2 - Scan at 100%, 300ppi, to 'archive' the print.
3 - Do some basic digital colorization, then print that, letter size, on cheapo paper and do some color(planning), w/ colored pencils, as a guide.
4 - Apply what you have learned in step 3...
and do watercolors(for details) ...and then oil colors for all the rest.
5 - Maybe let the print sit around for a while, to dry...and then attack it again, w/ a bit mo' color.
6- A last step?...scan the hand-colored image, and give it another 'kick in the butt' with P'shop.
So here's the three images:


To see 'em all larger, a page on my site:
www.bobbennettphoto.net/BeachBlog_2013/Handcolor/index.html
..................................
In the 'whatever catches my eye' file this month?
Lots of things!
Not a week goes by without another story on the death of analog.
http://www.slate.com/blogs/behold/2013/07/11/robert_burley_s_disappearance_of_darkness_photography_at_the_end_of_the.html
But folks, if you've worked w/ both, you know it's just not that simple.
Here's an interesting discussion of film vs. digital:
http://www.kenrockwell.com/tech/filmdig.htm
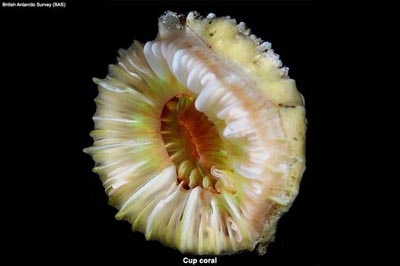
'What lurks in the deep water off the most remote inhabited island in the world? This past month, a team of researchers trekked to Tristan da Cunha, an island in the middle of the South Atlantic Ocean, to find out.'

( This is called a Cup Coral - Photo: © British Antartic Survey)
http://news.yahoo.com/expedition-isolated-island-yields-stunning-photos-133514638.html
http://news.yahoo.com/bizarre-500-million-old-creature-unearthed-002426314.html
http://news.yahoo.com/jets-molten-rock-push-earths-tectonic-plates-170346420.html

Quite a while, which actually became something of a problem.
First of all, if you haven't read a previous post of mine about hand coloring, 'all the basics', you really should take it in:
http://californiasilverwizard.blogspot.com/2009/06/hand-coloring-b-photo-prints-dying-art.html
One thing i have corrected/added to this post is:
USE A NON-HARDENING FIXER! AND MATTE SURFACE PAPER!
Yes, ALL CAPS is the equivalent of yelling. I am not quite yelling, but saying most strongly, 'use a non-hardening fixer', and matte paper. You'll be glad you did. :-) Also, don't wait too long to hand color a print, these three were printed a few years ago, and I'll bet that letting them be for a long time led to a certain amount of 'hardening' that made the coloring more difficult than usual. The blues, in particular, just did not sink into the paper well, at all.
Which led me to add an extra step to the image refinement process - scanning the hand-colored print, and correcting the blues w/ photoshop.
My methods/work-flow has changed over the years. Obviously, I start w/ a B&W darkroom print. I scan that at 100%, 300 ppi, so i've got it archived.
I print these out at letter size, on cheapo copy paper so i could do a sketch with colored pencils, to get a better idea of what i wanted to do. I guess i could spending hours more doing this in digital?... I'd much rather do ALL of it in about 30+ minutes with some cotton balls and Q-tips.Yes, i'd rather do it the old fashioned ('by hand') way. I usually do some basic colorization of large areas w/ photoshop, I know that's what I'm going to do w/ the handcoloring.
For these prints? I do some initial 'detail' coloring with a small brush and some watercolor inks.
One thing to do to make the watercolor inks go down right/one good hint on watercolors? add some 'photo-flo' or 'wetting agent' to the water you use, and wet down the areas you want to color, BEFORE you add the color - it'll go down much smoother, you'll be glad you did this, the brush strokes will show MUCH less.
If you are working w/ just 1/4 cup water? 1 drop will do.
Then i did an over hand-color w/ oils, first applying some linseed oil, letting it soak into the paper, then wiping off any excess.
It's hard to get the saturation i want in some areas in just one coat, so i let them dry for a couple of weeks - you really need to let them dry *completely* before you go back and add more, otherwise the oil will still be able to 'seep into the previous layer', and take it off, & you'll end up w/ a miserable mess.
Then i did another round of oil colors on them, in less than 2 hours.
The subtle things i can do by hand are much better than anything digital.
Even after thew second round of hand color, i just couldn't get what i wanted out of the blues, in particular, on two prints. So i scanned the prints, and dragged 'em into photoshop, and solved the problem easily.
So here's the process:
1 - Darkroom print
2 - Scan at 100%, 300ppi, to 'archive' the print.
3 - Do some basic digital colorization, then print that, letter size, on cheapo paper and do some color(planning), w/ colored pencils, as a guide.
4 - Apply what you have learned in step 3...
and do watercolors(for details) ...and then oil colors for all the rest.
5 - Maybe let the print sit around for a while, to dry...and then attack it again, w/ a bit mo' color.
6- A last step?...scan the hand-colored image, and give it another 'kick in the butt' with P'shop.
So here's the three images:
Mountain Mirage
From left to right, the B&W, the sketch, and the final hand coloring.

Voyage
Top left - the B&W, top right - the sketch, bottom left - the first round of hand coloring, bottom right - the final, w/ additional handcoloring, and some photoshop to saturate the blues extra.

Reservation Required
At left, the twice hand colored version with blues that just didn't sink into the paper, on the right, 'photoshop to the rescue' on the blues.

To see 'em all larger, a page on my site:
www.bobbennettphoto.net/BeachBlog_2013/Handcolor/index.html
..................................
In the 'whatever catches my eye' file this month?
Lots of things!
Not a week goes by without another story on the death of analog.
http://www.slate.com/blogs/behold/2013/07/11/robert_burley_s_disappearance_of_darkness_photography_at_the_end_of_the.html
But folks, if you've worked w/ both, you know it's just not that simple.
Here's an interesting discussion of film vs. digital:
http://www.kenrockwell.com/tech/filmdig.htm
'What lurks in the deep water off the most remote inhabited island in the world? This past month, a team of researchers trekked to Tristan da Cunha, an island in the middle of the South Atlantic Ocean, to find out.'
( This is called a Cup Coral - Photo: © British Antartic Survey)
http://news.yahoo.com/expedition-isolated-island-yields-stunning-photos-133514638.html
http://news.yahoo.com/bizarre-500-million-old-creature-unearthed-002426314.html
http://news.yahoo.com/jets-molten-rock-push-earths-tectonic-plates-170346420.html
Next Month?... into the darkroom!

